NEO Planner V5.0 - Revise - Explanations
Within the picture, click on the area that you want to be explained: (not in all browsers available)
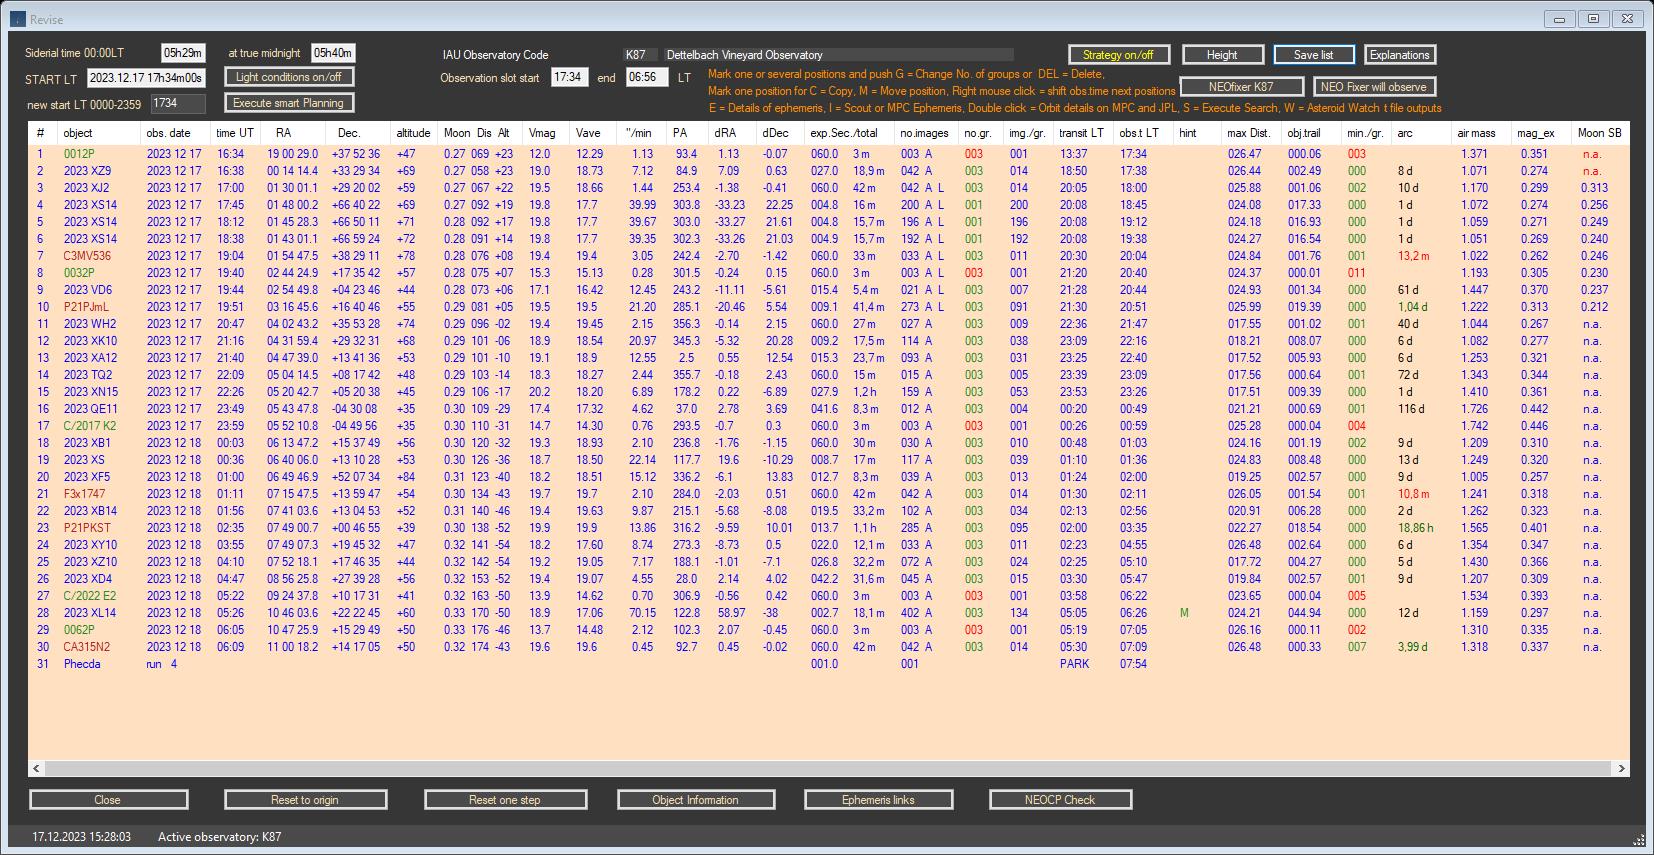
Program from November, 30 2024 for K87 Dettelbach Vineyard
Observatory:
35 NEOs from the planning were measured, one of which
was a confirmation of a NEOCP object.
In addition, 3 comets and 24
main-belt objects were measured.
Copyright: The
data comes from official access to web services from
MPC,
JPL,
NASA and
ESA,
whose origins are the tireless measurements of dozens of professional and
amateur observatories around the world
The order of the objects is always in ascending order according
to R.A. at the time of planning.
When controlling the equipment automatically, attention must be paid to the
following:
The observation times (obs.time LT)
should ideally be around the transit times (Transit LT)
of the objects,
in order to get the best possible images of the objects during
the measurement.
In any case, you should keep an eye on the maximum altitude (altitiude),
the higher the better.
When observing under increasing or decreasing moonlight around full moon time, two strategies are recommended:
1. During the entire observation time there is a period of
negative lunar altitude:
At your own discretion and experience, increase the group
count (No.gr.) up to double or triple for those
objects
where the position's Moon altitude (Moon alt)
is positive.
Do not change group counts on objects observed during
moonless periods in the list.
2. Around the actual full moon time, when the moon is always
above the horizon during the night session,
we recommend increasing the number
of groups in the CCD/CMOS settings
in the "Number of measurements/object for MPC" line. Again,
you should double or triple the number. Example 006 or 009.
In this case, the number of groups is increased when planning from
the outset. Changing the sky background value is not recommended.
Please don't forget to reset the values later.
3. Best observation strategy during the
night-session:
After the revised planning and after starting the
observations, you can access a special window in Revise by clicking the 'NEOCP
Check' button.
There you activate the background job 'Background Check (every
5 minutes)'.
Two new windows then show changes on the NEOCP page of the
MPC at regular intervals.
You can observe these changes and if there is something
interesting you stop the background job.
Then pressing 'NEOCP Check' will update the current and
revised plan with new NEOCP data while retaining the revised plan.
The 'Refeshing Revise' button then updates the Revise and
Object Information Windows. Then you can start the background job again.
New feature since May 2025:
When the NEOCP background check is active, a newly assigned provisional number
is now displayed in dark violet in the Hint column
of the Revise Window for NEOCP objects, if available. In this case,
the old NEOCP designation is also displayed in dark violet.
In addition, some columns in the Object Information Window are displayed in dark
violet.
If a new provisional number is displayed in the Hint column, it can be useful to call
the dark violet colored Smart Execute Planning in Revise.
Important hint:
NEO Planner always plans all objects that are
in the selected RA area in the Settings Common restrictions
and in the defined area of the declination in the Settings
Object Selection.
It is the defined range of RA hours west and RA hours east of
siderial time.
NEO Planner then schedules these objects according to the CCD
parameters, regardless of altitude.
This means that objects can also appear in the Revise Window
with the Altitude displayed in red, mostly objects at the end of the planning.
NEO Planner does not automatically intend to exclude objects
below the allowed altitude,
but indicates this with red color in the Altitude column in
the Revise Window. Because such objects can be quite interesting.
You can now revise the displayed list and, for example, by
deleting individual objects or by moving objects
or by increasing
group values on previous objects
you can achieve that all objects on the list in the
Altitude column are displayed in green.
Then observing below the permitted altitude should not happen
in NINA or ACP.
Siderial time RA at 00 LT and true midnight:
The sidereal time is a central and by no means one of the most important parameters of NEO Planner.
The magic formula is: (Special design for NEO Planner by Father Christoph Gerhard (K74)):
Siderial time (decimal) = 6.625 + 0.06570982 * (Current date - '2019-01-01' + 1) + geographical longitude / 15 + 1.002738 * (midnight UT (decimal))
Then the conversion into hours
and minutes takes place.
The formula shows that longitude plays an important role, which enables NEO
Planner to be used in all regions of the world.
The sidereal time in
combination of RA object is the criterion for reliably determining NO GO areas,
since the transit times of objects through the meridian have to be taken into
account, especially with German mounts.
In addition, the sidereal time helps to calculate the correct order of the
objects according to RA.
Both the sidereal time and true midnight UT is saved with every planning in the SiderialTime.txt file in the <Daily Planning> folder (see File Structure settings).
A guide for getting an IAU observatory code you find here: Guide to Minor Body Astrometry (minorplanetcenter.net)
List of observatory codes: List of observatory codes - Wikipedia
The calculated local starting
time of the planning is determined from various sources.
The basis is the daily loading of current astronomical data of a location from
IpGeolocation.io,
which takes place automatically when NEO Planner is
started. See also: GEO
Settings.
The offset hours and minutes that were specified in the
Common Restrictions
settings are added or subtracted from the determined local sunset and
sunrise times.
The start and end times of the
planning can only be reliably calculated in this way,
since automatically determined twilight times are not suitable for depicting the
observation slots obtained from empirical values.
Only the observer himself can determine when the observation should begin after
sunset. This depends on the experience of the observer himself.
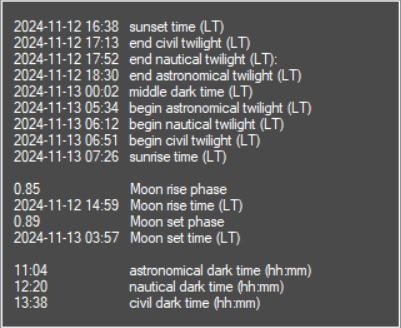
Display of the light
conditions via a list box.
At higher latitudes in the hemispheres, reduced data
is shown around the time of the summer solstice and missing astronomical time.
The observation period in local time and universal time of the coming night.
The basis is the daily loading
of current astronomical data of a location from
IpGeolocation.io,
which takes place automatically when NEO Planner is
started. See also: GEO
Settings.
The offset hours and minutes that were specified in the
Common Restrictions
settings are added or subtracted from the determined local sunset and
sunrise times.
On the one hand, the entire window is saved as .jpg in the archive folder.
In
addition, the content of the list display is saved both in .txt
and .csv files for further
use (see
File Structure settings).
Additional backup of the Revise Window as an
.HTM file,
if allowed in the Privacy.
Now both the
Revise
Window and the
Object Information Window can be saved as an HTM file on the NEO Planner
Server and accessed
or linked for free use on the Internet via any browser.
Here you can enter the start time of the first object
manually if it should deviate from the suggested start time.
By pressing the >Smart execute planning< button next to it, a short re-planning
takes place with the specified start time.
All changes in the planning list can be recalculated using two methods.
With this button you can specify whether changes are only replanned after
pressing the Execute
smart planning button (background color of the button = olive),
or whether the plan should be recalculated immediately after each change
(background color of the button = dark blue).
You can switch back and forth between the two methods while editing the plan,
depending on the application or taste. In any case, the last setting is saved.
The schedule is run again with the specified start time on the left, but
significantly reduced.
There is no re-determination of the objects, only a
correction of the suggested observation times.
The positions of the objects are also adjusted.
In addition, the XML and
JSON data for N.I.N.A import, ACP and .csv
files are reissued in the archive folder for further use there.
Useful times for smart planning are between the current nightly hours.
We have also a significant performance improvement in the revise window.
The revision of the planning is now faster and takes place without recalculation.
The planning is only completed by pressing the Execute smart Planning button. A
red button indicates that planning still needs to be done.
By marking positions you can perform various actions such as C-copy, M-move, DEL-delete, G-adjust stack groups, E-ephemeris details, I-Scout or MPC details.
The local observation times of the following objects can
be moved forward between 0 and 600 minutes by right-clicking.
These changes are marked by a colored display of the observation time LT.
Red means: Execute smart planning is pending,
green means: rescheduled.
Zero is also allowed for undo.
Manual time entry:
Particularly interesting for the observation of
exclusively NEOCP objects
The observation local time can also be entered manually in the format
hhmm by pressing T on the position.
If possible, an input around the best observation time when an object passes the
meridian is a good value.
These manually times are marked by a colored display of the observation time LT.
Red means: Execute smart planning is pending,
dark green means: rescheduled.
If a manual observation time was entered using
the T function in Revise, it is displayed in the
Hint column in dark green.
After one or
more of the editing functions have been executed, the Execute Smart Button will
appear red.
The observation data of the list will only be recalculated after replanning
using the Execute Smart Planning button.
The following rule applies to Execute smart Planning:
If the manual time (function T)
is less than the calculated time of the position, the manual time is
overwritten with the calculated time.
Pressing 'S' on an object line takes you to the Execute Search Window.
There the object position is displayed centrally with a star background at the
time of recording and the track length of the recording.
This allows one to control the path of the object taking into account the star
field and the FoV of the equipment.
In addition to the planned path of a NEOCP object, its 1-Sigma deviations are also displayed as ellipses if appropriate.
Controlling whether the start position or center position of the object in
Execute Search is displayed in the center of the starmap picturebox
can be done
in the Execute
Planning Window
with the <Center Position> checkbox.
Asteroid Watch Eyes on Asteroids - Home - NASA/JPL
Neo Planner calculates observation times in R.A. order of
currently visible comets in green according to the official publication of the MPC
and
additionally the most recently observed comets from
CometasObs.
The reason for including the
CometasObs observations lies in the sometimes
considerable delay of the MPC in the publication of the last observations.
In addition, all NEOCP objects in red that can be observed according to the parameter settings are displayed.
In addition, visible NEOs in blue are included that have not yet been numbered, i.e. have a provisional number.
Objects with special object classes are displayed in black.
Observation date and time in UT:
The optimal
observation times of the objects are first calculated based on their meridian
passage and thus the sequence is determined.
The observation time in UT is then
calculated according to the calculated exposure times of all recordings.
The indicated position in R.A. and Dec. corresponds to the calculated Obs.time.
For non-NEOCP objects, the positions are determined by the
Horizons API.
For NEOCP objects
the positions are determined
Scout
Ephemeris page
with an accuracy of about 1 minute.
Notice for NEOCP objects:
Experience has shown that
Scout delivers better position results, especially with fast runners.
However, NEO Planner cannot provide exactly the same positions as shown on the
website.
The reason for this lies in the API method that NEO Planner uses to access the
Scout's data.
Scout calculates the positions of the NEOCP objects on the website in a
noticeable amount of time by averaging thousands of orbit calculations.
NEO Planner can compensate for this performance disadvantage by calling the API
interface with a request of 30 orbits.
This results in slight deviations from the display on the Scout website, which
is rather insignificant in practice.
The altitude corresponds to the height of the object above the horizon at the time of the displayed observation time.
NEO Planner schedules objects according to the CCD
parameters, regardless of altitude.
This means that objects can also appear in the Revise Window
with the Altitude displayed in red, mostly objects at the end of the planning.
NEO Planner does not automatically intend to exclude objects
below the allowed altitude,
but indicates this with red color in the Altitude column in
the Revise Window. Because such objects can be quite interesting.
When calculating the number of images during the planning run,
airmass and lunar sky brightness are only taken into account
if the objects are above the minimum altitude on the horizon at the time of
observation.
The displays of the moon phase, the distance between the moon and the object in
degrees and altitude of the Moon
relate to the
observation time and come from the Ephemeris Scout from JPL.
Comets: Average Vmag of the last 10
observations found in the
MPC Database.
If the MPC-Vmag is
more than 0.5 mag brighter than the average Vmag,
the MPC Vmag ist displayed and used for the calculation of the exposure time.
NEOs: Average Vmag of the last 10
observations.
If the MPC-Vmag is
more than 0.5 mag brighter than the average Vmag,
the MPC Vmag ist displayed and used for the calculation of the exposure time.
If the
MPC-Vmag is 1.0 mag weaker than the average Vmag, than the MPC Vmag ist
displayed and used for the calculation of the exposure time.
NEOCP objects: Vmag of the Scout Query
The displays for arcsec / minute (s / min) and position angle (PA) refer to the observation time and come from JPL's Ephemeris Scout.
Display of the dRA and dDec proper motion of NEOCP objects to enable the proper movement in RA and Dec for direct tracking of the objects.
A comprehensive description of the calculation of the exposure time can be found
on the
settings
parameter for the sky background on the page for CCD parameters.
In addition to the exposure time in seconds, Revise also
displays the total exposure time (seconds * number of images).
The number of images is calculated automatically by multiplying the number of groups and images / group.
If the maximum number of images specified in the
CCD/CMOS
Settings is less than the required number of images,
calculated from number of images per group * number of groups, the
number of images is displayed in red.
Notes on including Airmass and Lunar sky brightness in calculating the total number of images per object are also displayed:
A means: Airmass was taken into account for all objects
according to Horizons API.
L means: Lunar sky brightness
was taken into account for
all objects according to Horizons API.
Notes: Airmass
A and lunar sky brightness L are
only taken into account under the following conditions:
Object altitude > 0 and altitude > minimum altitude.
The group value
basically means how many measurements for each single
object should be sent to the MPC.
After planning, you can increase this value for each
object in the Revise Window if you want.
To do this, press the G key on the position line.
A comprehensive description of the number of groups can be found on the settings parameter for the sky background on the page for CCD parameters.
In the case of a group value of <4, the following applies:
Neo Planner uses the entered value from the settings at speeds of the object
greater than 3 arcsec / minute.
At speeds less than 3 arcsec / min. the value is multiplied by 2,
at speeds less than 1 arcsec / min. the value is multiplied by 3 and at speeds
less than 0.1 by 5.
If the movement of the object is less than the resolution of the camera and at
the same time the exposure time per group in the planning
is less than the
required exposure time
according to s/min, then the columns Groups and Min/gr. displayed in
red,
otherwise green.
Thus, if you want, you can achieve the required distance depending on the CCD
resolution by manually increasing the groups per object
or splitting them into several positions and adjusting the groups.
The automatic splitting of positions when the maximum allowed path of the object is exceeded is described here .
A comprehensive description of the calculation of the images per group can be found on the settings parameter for the sky background on the page for CCD parameters
Transit of the object thru the Meridian in local time, if the buffer time is zero in the NO-GO settings.
Exception: Buffer time in the
NO GO Area settings.
If the buffer time is greater than zero in the NO-GO settings, "Best LT" is
displayed as the heading.
But the buffer time in R.A. Hours before the meridian transit
is also considered, so that
there is enough time to photograph the object before the meridian transit.
When displaying the transit time in the Revise Window, this hourly value is
already subtracted from the transit time of the object.
The time is displayed in red when
no highest altitude can be found during the ephemeris determination of a NEOCP
object using Scout.
In this case, the last time found after 8 hours is used. This can happen with
low-lying objects in the early morning;
this constellation is usually found with newly discovered comets.
Important NOTE:
Because of the one-time calculation of the transit times, it is
highly recommended to enter only realistic selections for the planning
of the
upcoming night session during Execute Planning.
If the planning calculates objects beyond the next morning, there is a risk that
the transit times will be displayed incorrectly.
The user is responsible for using the plan data displayed.
Computed time of observation in local time zone.
The local observation times of the following objects can
be moved forward between 0 and 600 minutes by right-clicking
the position.
These changes are marked by a colored display of the observation time LT.
Red means: Execute smart planning is pending, green means: rescheduled.
The observation time can also be entered manually in the format
hhmm by pressing T on the position.
These manually times are marked by a colored display of the observation time LT.
Red means: Execute smart planning is pending,
dark green means: rescheduled.
The following rule applies to Execute smart Planning:
If the manual time (function T)
is less than the calculated time of the position, the manual time is
overwritten with the calculated time.
For NEOCP objects: If the Background NEOCP Check detects that a new provisional number has been assigned, it will be displayed in dark purple.
For all objects: if a manual observation time was entered using the T function in Revise, it is displayed here in dark green.
If none of the above cases apply:
W =
at the suggested time there is a real risk
that the object will cross the meridian.
W in blue color means: The object is already west
of the meridian at the start time of observation.
W in velvet green color means: The object is still
east of the meridian at the start time of observation,
but will cross the
meridian in the course of the observation.
In this case, you should also check the duration of observation of the
object.
If the object is more than an hour west of the transit
time during recording, the W indicator will be displayed in
blue.
F The object was not found on the
Scout page of the
JPL, possibly a nonexistent object.
On the other hand, this can mean that the object has been kicked out of the
NEOCP,
either because the object has now received a provisional number (publication
of a M.P.E.C),
or the object type has changed (e.g. Main Belt asteroid) or Scout just doesn't
provide any data at NEOCP.
T = The path of an object is
longer than the allowed maximum length of a recording series.
The automatic splitting of positions no longer
occurs at altitudes below the minimum altitude.
C = The path of the object is fully mapped in the FoV by using the center position of the track.
M = Mosaic position
S = Note in NEOCP S = satellite. Other notes may also be used on the NEOCP, these will then also
be displayed.
B = Note in NEOCP The'B' flag will indicate a nominal orbit
with a high RMS fit (RMS > 2"), signaling a possible bad
tracklet or unsuccessful
orbit fit that could
impact the predicted ephemeris and may require manual review.
Maximum path of an object from the center of the image to
the edge during a series of exposures.
This value is always displayed here from the center of the image, regardless of
the starting position of the object.
If <Center
Position> in Execute Planning is selected, the length of the
permitted object path is adapted to the start position.
Detailled informations on:
CCD Parameters
The path length of an object through the FoV is calculated based on the movement
of the object in arcsec/min, its position angle,
the exposure times including download load times and the number of exposures per
series.
Detailled informations on:
CCD Parameters
In column Min/gr. the necessary minutes for a single
group / stack are now displayed, according to the camera
resolution and s/min. Object.
If the movement of the object is less than the resolution of the camera and at
the same time the exposure time per group in the planning
is less than the
required exposure time
according to s/min, then the columns Groups and Min/gr. displayed in
red,
otherwise green.
Thus, if you want, you can achieve the required distance depending on the CCD
resolution by manually increasing the groups per object
or splitting them into several positions and adjusting the groups.
With each updated planning, the arcs of NEO and NEOCP objects are displayed in days (d), hours (h) and minutes (m).
When one of the checkboxes on airmass is activated, the relative airmass of the location is taken into
account
when calculating the number of images per group/stack.
Detailed information about airmass can be found here.
When observing objects and the sun is in astronomical
twilight,
Horizons' Lunar Sky Brightness #48 can be taken into
account when calculating
the necessary number of exposures for a single measurement.
If the sun is outside astronomical twilight at the time
of recording and the moon is above the horizon at the time of observation,
the value "n.a." displayed in red.
In this case, you should intervene manually according to experience according to
the information in the "Moon Dist Alt" column.
Depending on the phase of the moon you can see the number of groups in column
'no.gr.'
Increase this value, e.g. at quarter moon by factor 1.5,
half moon by 2, three quarter moon by 3 and around the full moon by 4.
Detailed information about Lunar sky brightness be found here.
All changes are reversed and the original planning is restored.
Displays a
window with
special information about the objects such as number of previous observations,
date and observatory of the last observation,
type of object, orbit element data or flyby data.
By pressing the E key in a line of an objects, you get a
display of
ephemeris to the minute, which can be selected up to a period of 8 hours.
There you can save the ephemeris with SAVE. The Ephemeris
list button then points to a website from which you can call up
all the
ephemeris of the planning from any PC.
The NEOCP Check function enables the planning to be updated quickly, including
the current NEOCP display.
It is checked whether there are updates for
individual NEOCP objects,
whether these have been deleted or an M.P.E.C. publication
took place.
If new provisional numbers are assigned, these will be determined
and displayed.